A couple of weeks ago my friend Netta wore a beautiful long wrap skirt/trousers to church. We all admired her new outfit, which had been a present from her son, who had just come back from a holiday in Thailand. I had never seen wrap-around trousers like hers before and I was fascinated. Netta kindly let me have a look at the fabric and the construction so that I could try to make a pair for myself.
Once I got home a quick search on google for wrap trouser patterns showed me that what Netta's son had given her were Thai Wrap Pants, Sarong Pants or fisherman's trousers and there were lots of posts, blogs and vlogs showing you how to draft a pattern and make your own.
I bought 2 metres of this lovely, drapey, viscose fabric from Leicester market for just £1.50 a metre to experiment with. I had a vision of a pair of loose fitting wrap trousers which might not be suitable for the colder weather that is on the way but would be ideal for the Christmas party season and would come out again next summer.
All of the patterns and instructions I saw on line were drafted free-hand but I decided to base my design on my pyjama trouser pattern. The fabric wasn't expensive but I didn't want to make a mistake and have ill-fitting trousers. I wanted mine to look good enough to wear out in the evening, not just for the beach. So, now I confess that, when I made the pyjama trousers in my last post
here I was already planning ahead and testing a pattern ready to make this new project. My first pair of pyjama trousers, made from the lilac cotton, came up a bit too big and certainly too loose for evening trousers. I was much happier with the second pair so I based my wrap trousers on the smaller pyjama trousers.
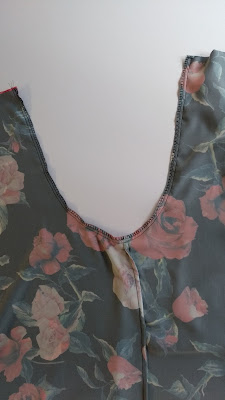
Following the instructions I had read on line, I cut the 2 metres of viscose into 2 pieces each measuring a metre long. First I trimmed a 5cm strip from the selvage edges of each piece giving me 4 x metre-long strips to use for the waist ties. I folded each large piece in half length-ways and laid one piece of the pyjama trouser pattern on each.
 |
| Trouser pattern pinned to the fabric near to the folded edge |
Then I only cut along the inside leg and centre front seams of the trousers keeping the excess fabric on the outside leg seam to make the wrap-over.
 |
| Double layer of fabric cut along the inside leg and centre front only |
I sewed French seams on the inside leg seams just as I had when I made the pyjama trousers and neatened the crotch seam with the overlocking stitch from my sewing machine. This fabric frayed really badly so it was very important to neaten all of the seams.
 |
| French seam and overlocked crotch seam. |
Then I measured the waist at the back and front of my trousers and cut these so that they were each long enough to go all the way around my waist with a 5cm allowance at each end for a nice wide side seam. I pressed the side hems and stitched them with a straight machine stitch. These wide hems lie flat and didn't stretch out at all when I stitched them. They give the wrap-over sections a firm edge that hangs down neatly when the trousers are worn. I think that a narrow hem could have been rather wavy.
 |
| 2cm wide side hems. |
I joined two of the narrow strips together to make each waist tie (If I make wrap trousers again I will cut the ties before I cut my fabric in half to avoid having to join them together again, but I didn't plan that far ahead this time). My fabric was very soft so I interfaced the central waistband section with a strip of medium weight. iron on interfacing half as wide as the band. I attached the waistbands right sides together to the top of the front and then the back of the trousers taking a 3cm seam allowance. Once the waist band section was attached I folded the ties in half length-ways, right sides together and stitched all the way to the ends to form two ties on each side of my trousers. Then I clipped the corners and turned the ties right sides out.
 |
| Inside waist-band and ties |
I decided to hand stitch the inside edge of the waist band in place to make sure it looked neat.
 |
| Detail of the machine-stitched hem |
Then I tried on my trousers and took up the hem at the bottom to the right length.
 |
| A before and after the diet photo!! |
I am so pleased with these wrap trousers. They are very similar in style to the pair that I admired and set out to copy. I have tried tying them with a front and rear overlap and I think that I prefer the overlap at the back giving a smooth, neat front panel, what do you think?
I only had one problem during the construction, which really wasn't a sewing problem at all, and I will tell you about that in my next post...


Amazing! These are going to be perfect for the festive party season and next summer. What a brilliant make in such a pretty fabric too.
ReplyDeleteAll I need now is an occasion to wear them!
Delete