
The maid was in the garden
Hanging out the clothes
When down came a blackbird
And pecked off her nose.....or his!!
About six months ago my husband retired and went back to work part-time. Since then he has taken on responsibility for the family washing on his days off. This is why I now have time to sew and write this blog. Last week he asked me to make something for him, and how could I refuse?
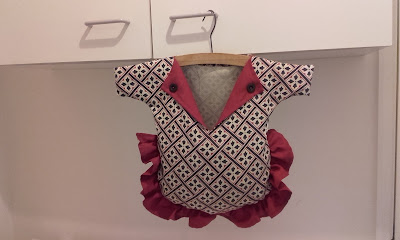

We have a peg bag which hangs on the washing line and looks like a little dress. I made this about a year ago. However, this really doesn't suit the man in my life. He doesn't like having to walk backwards and forwards to get pegs out and put them back. He asked me for a peg apron that will hold all of the pegs within easy reach.
I found lots of patterns for peg aprons on line but none that really supported the weight of the pegs. A family of 5 generates a lot of washing and we use a lot of pegs! I have drafted this peg apron from an old cookery apron and put a big pocket on the front to hold the pegs. I cut it much shorter since it doesn't need to protect his clothing from spills.

I needed a sturdy fabric so I bought one metre of 100% cotton London Street Signs craft fabric from Dunelm, which I thought looked suitably masculine.

For a contrasting binding I used 3 metres of red tape or webbing. I could have cut bias binding instead, the Butchers Apron in my Great British Sewing Bee book from series 1 recommends 3 ½ cm wide bias binding for their apron, but I was worried that bias binding would stretch and not hold its shape for long.

For a contrasting binding I used 3 metres of red tape or webbing. I could have cut bias binding instead, the Butchers Apron in my Great British Sewing Bee book from series 1 recommends 3 ½ cm wide bias binding for their apron, but I was worried that bias binding would stretch and not hold its shape for long.
Using the old apron as a pattern I allowed 2cm hems along the top, bottom and sides of the apron. I stitched these straight hems first.
Then I drafted a pattern for a large pocket from newspaper. I knew that the pocket would need support in the centre so I designed it to have two openings and a seam along the centre top. I allowed 1cm seams all around the pocket, which I pressed before top-stitching in place.
Instead of bias binding I bound the openings of the pockets with the red webbing, tacking it first and then top-stitching through all of the layers. This binding seems to have really brought out the red lettering on the fabric, which wasn't very noticeable before. I hope that the webbing will be strong and will stand up to lots of wear and tear getting the pegs in and out of the pocket. Once I had bound the pocket openings I attached the pocket to the main apron. I have double stitched around the edge for extra strength.
I have created some fullness by attaching the top of the pocket slightly lower so that the openings gape a bit and make it easier to get your hands in and out without looking down.

Last of all I used the rest of the bundle of tape to bind the curved arm hole edges of the apron and to make the neck strap and waist ties all in one piece. I turned back and hemmed the ends of the ties to stop them from fraying. This apron is made for one person to use so the neck strap doesn't need to be adjustable, But you could add some D rings if you wanted to make a similar apron and couldn't be sure how long the neck strap needed to be.

There shouldn't be any more frustrating moments, not having a peg to hand when he wants one. And the pegs will be stored in the apron, hanging on a hook by the back door, right by the washing machine.

The added bonus is that I didn't need to use the whole width of the fabric for this apron so now I have enough to make myself a new bag.
From a user's point of view, I have to say that it is brilliant! It is so much easier to have the pegs within arm's reach all the time, both for pegging out and collecting in again. Great job Rosemary!
ReplyDeleteSo glad that you like it.
Delete